Wednesday, 22 January 2020

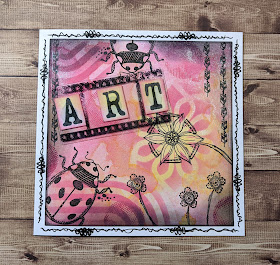
Doodle ladybird Art card

PRODUCTS USED:

Bee Crafty doodle art ladybird stamp set regular

Bee Crafty texture, filmstrip and circles stamp set

Wordage - creativity words LARGE

Distress ink/oxides

Versafine onyx black ink

Texture discs set 2

Pearlywinks sprays
6x6 card blank & smaller die cut card mat layer
Acetate
Stazon black ink
...................

HOW TO MAKE:

Create a background using pink and yellow ink sprays (I used the Pearlywinks ones as I love the shimmer)

Die cut the background to a size that is just smaller than the 6x6 card base...
Using the mandala flower texture disc add detail to the background with picked raspberry distress oxide

Using another texture disc add more details for interest, I tend to work in 3s - triangles, it just works well

Using black onyx versafine I started to add stamped elements to build up my card - I liked the flower inside the flower look...

Kept adding elements, ladybird, borders, small flowers etc

Then I took the circle from the texture, filmstrip and circles set and stamped more detail in picked raspberry oxide - it just added more texture/depth

Then I stamped the filmstrip onto acetate using stazon, I wanted it to be a window for my sentiment

Then I used the large activity words to stamp my sentiment - I cut the word art out and glued it behind the acetate film strip using a glue that dries clear...

Then using the collall silicone 3D glue to stick the sentiment to my card front

Added a squiggle border using a posca fine nibbed paint pen and stamp detail from one of the tiny flower stems in the ladybird set.

ALL DONE! 

HOPE YOU LIKE
❤️
THANKS FOR LOOKING!
Wednesday, 15 January 2020

Do what you love Tag

Caz Harwood - Do what you love Tag


PRODUCTS USED:

Bee Crafty doodle bird stamp (regular) 

Bee Crafty small words sentiment stamps

Embossing powder clear
Versamark ink
Versafine clair nocturne
Archival black ink
Intense pencil
Distress ink black soot
Distress oxide spray wilted violet
Tag die by Sizzix/Tim Holtz

HOW TO MAKE:

Ink up the small word sentiments in versamark clear ink and stamp onto the tag. Sprinkle clear embossing powder over and heat to melt.

Blend over black soot distress ink to reveal the small words you embossed. This is a resist technique. Wipe over with a dry cloth to polish the wording up so it pops.

Next spritz with some water droplets to add texture to the background.

Take a couple of the background elements from the doodle bird stamp set and using black archival create interest in the background.

Stamp out the doodle bird and flowers onto scrap card using versafine clair. (I like this ink for its crisp detail and it's permanent once dry.)

Colour and fussy cut the elements, including a small word sentiment.
I used Derwent intense pencils to colour.

To finish the tag I added a crinkle ribbon which I stained purple using distress oxide spray. I find buying a plain colour ribbon and staining it to match your project works really well. 

Thats it! You're done.
Hope you like! 
❤️
Thanks for looking. 

Eternity card

Caz Harwood - Eternity card


Someone's a BIG stamp can be intimidating, so on this CAS card I've shown you how to just stamp elements of the design to create with.

PRODUCTS USED:

Bee Crafty time measure stamp

Bee Crafty life words

Distress inks/oxides

Versafine clair nocturne ink
Archival grey ink
Versamark clear ink
White embossing powder
6x6 card blank and mats

HOW TO MAKE:
Partially ink up and stamp a section of the time measure stamp that interests you - I chose the clock face element...

Ink up and stamp other elements to add more interest to your design.

Water colour some squeezed lemonade distress ink over the design

Stamp out the circle details, fussy cut and colour with twisted citron oxide - glue onto your design. Stamp the word life in archival grey ink.
Glue your mats to the card base and add the eternity sentiment in white heat embossing to finish. 

Hope you like
❤️
Thanks for looking!